[Django] Poll 프로젝트 3 (마지막)
Polls 프로젝트 3
투표시스템 결과확인
저번시간에는 저희가 질문지를 라디오 버튼을 통하여 선택하는 것과 submit버튼을 제작해 보았습니다.
오늘은 제작한 submit버튼을 눌렀을 때 선택한 결과가 반영되어 결과페이지에서 확인하는 기능을 넣어보겠습니다.
방식은 저번 방식과 동일합니다.
views에 함수추가
urls에 path 추가
templates/ .html 생성
detail.html 과 연결
templates/ .html 수정후 완료
그렇다면 이제부터 기능을 만들어보겠습니다.
template 폴더에 result.html파일을 생성해줍니다.
polls/views 로 들어가서 하기내용 추가합니다.
def vote(request, choice_id):
vote_result = get_object_or_404(Question, pk=choice_id)

selected_vote = vote_result.choice_set.get(pk =
                  request.POST['파이썬 라디오버튼에서의 name'])

selected_vote.votes += 1
selected_vote.save()
context = {'vote_result':vote_result}
return render(request, 'vote.html', context)
코드설명
이전 시간과 중복되는 내용은 제외하고 설명하도록 하겠습니다.
selected_vote = vote_result.choice_set.get(pk =
                  request.POST['파이썬 라디오버튼에서의 name'])
라디오 버튼선택한 정보가 name 인자와 value 값의 쌍으로 전달받습니다.
selected_vote.votes += 1: 선택한 것에 대한 votes 항목을 추가합니다.
selected_vote.save(): 변경된 값을 저장합니다.
polls/ urls.py 파일을 열고 하기 경로를 추가해줍니다.
path ('<int:choice_id>/vote/' , views.vote , name ='vote')
template 폴더에 detail.html파일로 돌아가서 하기처럼 form tag를 수정해줍니다.
<body>

    <h1>{ {choice_list.question_text} }</h1>

    <form action="{ % url 'polls:vote' choice_list.id % }" method="post">
    { % csrf_token % }
        <ul>
            { % for tmp in choice_list.choice_set.all % }
            <input type="radio" name="choice_button" id="{ { forloop.counter } }" value="{ {tmp.id} }">
            <label for='{ { forloop.counter } }'>{ {tmp} }</label>
            { % endfor % }
            <input type="submit" value="제출">
    </form>

    </ul>
</body>
코드설명
<form action="{ % url 'polls:vote' choice_list.id % }" method="post">
post 방식으로 url 의 polls라는 이름에서 name = vote라는 기능을 사용합니다.
인자는 choice_list.id의 객체를 전달합니다.
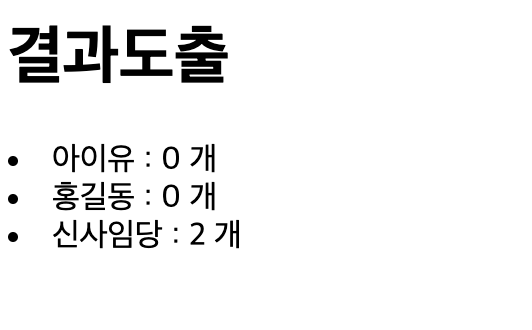
마지막으로 result.html을 작성하여 마무리 하겠습니다.
<body>
<h1>결과도출</h1>

{ %for tmp in my_result.choice_set.all % }
<li>{ {tmp} } : { {tmp.votes} } </li>
{ %endfor% }
</body>
상기항목을 추가하면 드디어 Poll 프로젝트가 하기 그림처럼 완성됩니다.

이번 시간에는 Poll 프로젝트에 대하여 마무리를 해봤습니다.


Leave a comment